
Club Member Lawrence writes about his time at Britcon & tells of his luck at the DBMM tournament!
Britcon is the main British Historical Games Society event of the year and includes tournaments in numerous rule sets, trade stands and a bring and buy. More details can be found at http://www.bhgs.org.uk/britcon.html
This is a report on how my games went in the DBMM tournament. The tournament covered the whole period from 3000 BC to 1515 AD, so this is the one chance in the year to find out which was “the best army of all time” (at least, all pre-renaissance time). Armies were 400 points and the scale was 15 mm.
My army was Patrician Roman (Western, in Gaul, 452 AD), slightly adapted from one I had used at Roll Call earlier this year. The order of battle was:
CinC Aetius, brilliant general - regular light horse (superior)
4 Auxilia Palatina – regular auxilia (superior)
5 Foederati foot - regular auxilia (superior)
1 Equites Illyricani - regular light horse (ordinary)
6 Alan mercenaries - irregular light horse (superior)
Subgeneral - regular cavalry (ordinary)
5 Equites - regular cavalry ordinary)
5 Gothic and Alan lancers - regular knights (fast)
1 Equites Illyricani - regular light horse (ordinary)
Subgeneral - regular light horse (superior)
4 Legionarii - regular blades (ordinary)
2 Garrison legionarii - regular blades (inferior)
3 Archers supporting legionarii - regular psiloi (ordinary)
6 Auxilia Palatina - regular auxilia (superior)
5 Archers supporting auxilia - regular psiloi (ordinary)
Army baggage
6 Pack mules - regular baggage (fast)
Stratagems
Feigned Flight, Invader’s concealed command
Note : Left and Right below refer to directions from my point of view.
Quick DBMM terminology guide:
In DBMM (as in DBA) the basic “unit” is an “element” or “base” i.e. 2-4 figures fixed on a base, representing roughly 100-200 men in real life. So when I say “6 Alan Mercenaries” above it means 6 elements, i.e. maybe 600 horse archers in real life. It doesn't have multi-base units like most games, but elements are grouped together into 3 or 4 “commands” for command and control and morale purposes. Commands don't have to move together and can be split up, but become harder to control. Generals command each command and roll a dice each turn to see how many “PIPs” they get, which they spend on moving their troops (or preventing them from advancing if they are impetuous or from routing if they are broken). Troop types are mostly obvious, but for the avoidance of doubt “blades” = all heavy foot other than spear and pikemen, “psiloi” = foot skirmishers and “auxilia” = loose order foot with javelins and usually a sidearm and shield, possibly also armour.
Quality levels are inferior, ordinary, superior and fast (which means looser formation and less armour than normal for that troop type, but faster movement). Below I have mostly used historical troop type names which you can easily find on google if you don't recognise them.
Games are scored out of 25 points which are split between the players depending on how much damage they did to each other.
Game 1 : Keith Nathan, Navarrese, 1350 AD
Potentially a tough match-up as he would have Norman superior knights, free company superior blades and superior longbowmen, and more superior auxilia (the Navarrese themselves) than me. On the other hand, my command and control would be better.
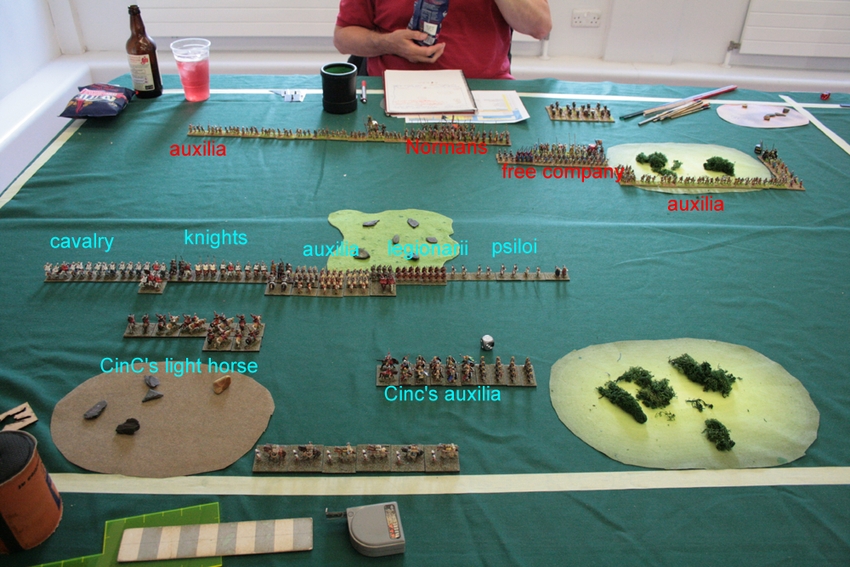
I invaded a battlefield with a lot of rough going features, mostly around the edge, but with one patch of rocky ground in the middle that would give my infantry some protection from the Normans. Deployment resulted in my knights and cavalry facing Navarrese auxilia on the left, my legions and auxilia behind the rocky ground, facing the Normans, some psiloi facing a free company ally command consisting of Gascons and English to the right of the rocks, and more Navarrese on a scrubby hill facing another scrubby hill on my rear right that Aetius reserve auxilia were poised to occupy. Aetius' light horse were behind the mounted command.
In the early phase of the game, Keith moved his Normans to face my mounted and his left wing auxilia to the right, then made a U-turn to bring them back to face my cavalry that was attempting to outflank the Normans. This meant the Navarrese general was now at the front of the column instead of the rear. The free company was unreliable – “Free” does not mean you don't have to pay them. Some crossbowmen that were with the Normans came forward to shoot at my legionaries. On the right, the Navarrese infantry came off their hill to threaten my flank, so I moved my auxilia reserve to the right to oppose them, but they were too far back to have any influence at this stage. I moved my infantry command to the right as well and the light horse reserve came forward.
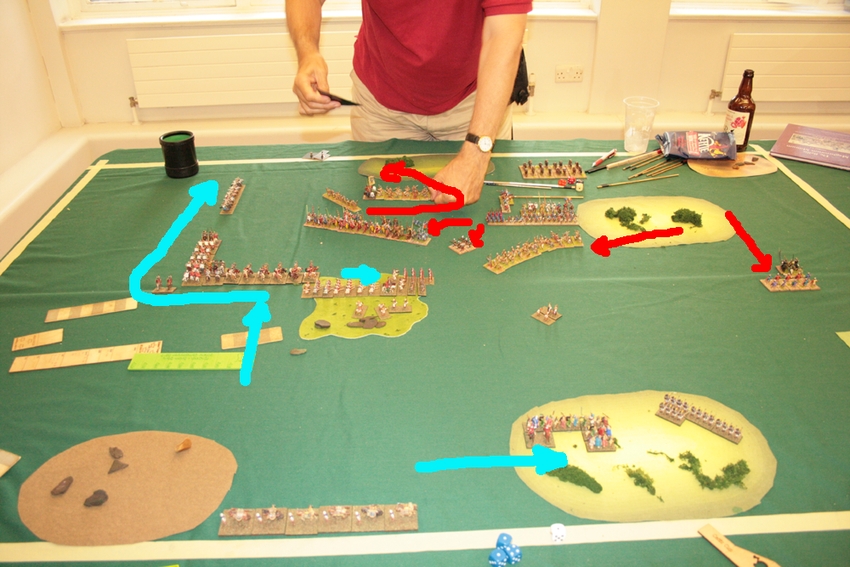
My cavalry on the left advanced to threaten the Navarrese auxilia. They were now close enough that one of the Norman knight units could charge them, which it duly did, supported by one of the auxilia. The knight killed his opponent, but the auxilia died. This left the Navarrese general vulnerable to a front and flank attack from my cavalry and, of course, he died. However, I didn't have enough PIPs (command and control points) to deal with the loose Norman knight unit, which went on to wipe out several more bases from my mounted command before I was finally able to surround and eliminate it.
While that was happening, my Alans charged the rest of the Normans and did a feigned flight. Two of the knights pursued impetuously and were eliminated by the returning Alans. My cavalry managed to break the leaderless Navarrese auxilia and seeing this caused the Normans to break too.
By that time a chaotic melee had developed between the other Navarrese command and my troops on the right, with casualties on both sides. However, the intervention of the now victorious Alans coming across from the left turned this fight in my favour, giving me an overall win for a score of 23-2.

Game 2: Ian Austin, Hittite Empire, 1336 BC
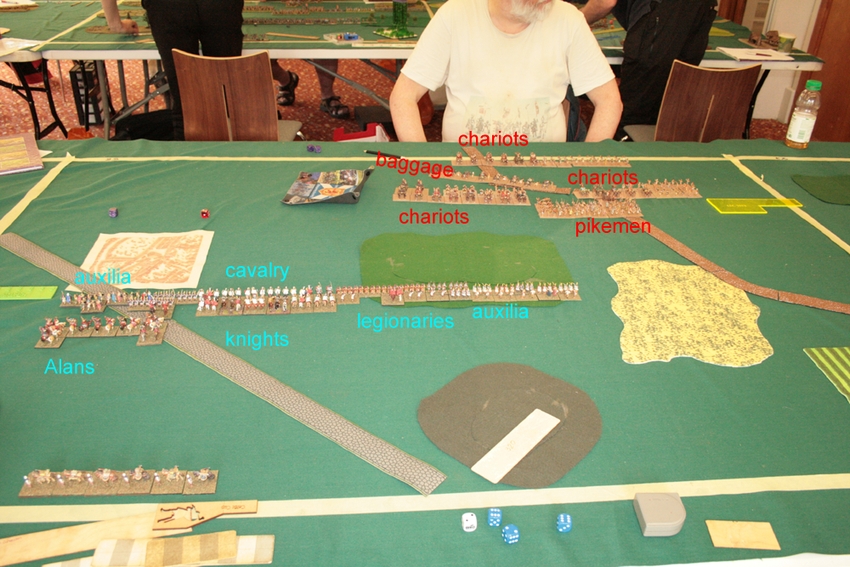
I had met Ian with more or less the same army at last year's Britcon and he had fought mine at Roll Call, so with both had a reasonable idea of what to expect. He had three substantial commands of light chariots (mostly superior with some ordinary) backed up by poor quality light foot and a fourth command of fast pikemen with a chariot general. He invaded and the battlefield was split by a vineyard, some rocky flat ground and a scrubby hill running in a line from my rear right corner to the centre of the table, and a built up area (BUA) also halfway across the table, but about 600 paces to the left of the hill. I deployed the foot command behind the hill, the CinC behind the BUA and the mounted in between. Ian deployed behind the hill and the rocky ground with two commands up, two back and the baggage in the middle of the army. This meant Aetius' auxilia were miles away from where they would need to be.
The weather was overcast with mud for the first three turns and a risk of rain that would lead to more mud, which would disadvantage his chariots and my knights. However, my poor PIP dice on turn 1 removed any risk of rain, so the actual fighting would take place in good conditions.
I advanced all my mounted through the gap and the Ian brought out chariots from all his commands to fight them. The remainder of the Hittite CinC's chariots faced off my infantry that had by now advanced over and off the hill to support my mounted. The Hittite pikemen wheeled to attack the end of the hill, I tried to hold them off with psiloi, which were in turn countered by Hittite auxilia. Meanwhile, Aetius' auxilia were marching across the rear of my army as fast as they could. The mounted forces engaged.
The left hand end of the Hittite line was mobbed by the Alans, who killed off one of the generals. His command soon broke, but the chariots in reserve counter-attacked and broke my mounted command, but the general was able to prevent them from running away. The Hittite CinC's chariots attacked my foot command but didn't do much damage. The end legionary element was hit in front and flank but threw off the attackers, which enabled the Alans to hit one of them in the rear and eliminate it. Meanwhile Aetius' auxilia arrived and engaged the end of the pike block, doing significant damage. Time ran out with losses standing at 36% of my army and 35% of Ian's, but he also had one command disheartened, giving me a 13-12 score.
Game 3: Thom Richardson, 100 Years War English, 1340 AD
Another tough-looking matchup with mutually supporting superior longbowmen and knights dismounting as superior blades, this time with good command and control. I forgot to take any pictures of this one until half way through. I defended and deployed opposite where I thought Thom's army would be, i.e. between Thom's nice-looking marsh on the right side table edge and a built up area and wood in the middle of his half of the table. The auxilia of the foot command were ready to enter the marsh and Aetius' auxilia to enter the BUA. The mounted command and the legionaries were between the two. Thom occupied the BUA with javelinmen (superior psiloi), filled two thirds of the gap with bow/blade commands and next to the marsh deployed a German ally with ordinary knights and some skirmishing crossbowmen behind the marsh. There as also an element of artillery on the road near the wood. At the back was a small command of superior bow and some Welsh spearmen at the back ready to block the space between the wood and the table edge. Weather was muddy again, but again conditions cleared up before we got to combat.
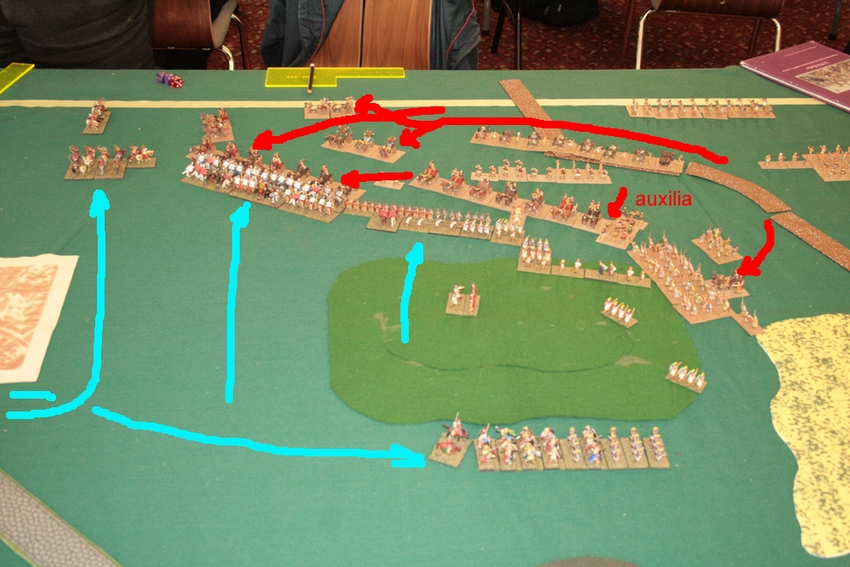
After several moves my auxilia had taken most of the BUA, and the Alans had tried to go around it but been engaged by some longbowmen in the gap between it and the wood. Dismounted knights had advanced beside the BUA and were starting to chop up the foederati. The rest of the longbowmen had advanced towards my mounted command, which had retired out of shooting range and detached a knight to the left and the light horse to the right. The German knights were starting to advance past the marsh with their flank guarded by more English dismounted knights and the German psiloi were trying to keep out of the way of the Roman auxilia and psiloi that had advanced through the marsh.

The disjointed fighting around the BUA continued with losses on both sides, though it has to be said rather fewer on my side than one might have expected. The longbowmen in the centre split up enough that I thought it worth preparing for a mounted charge on them, but the focus of activity was on the German knights' attack on the legions. I had left a couple of light foot out on the wing to threaten the flank of the knights as they came past. Thom detached two knight elements to deal with this threat and charged the legionaries with the others. The first charge was resisted. The second one wiped out the garrison legionaries who were hit in both front and flank, but the palatine legions recoiled their opponents and counter attacked, resulting in the German general being stuck in combat and unable to command properly in his turn. Meanwhile I brought an element of psiloi out of the marsh to harass the detached knights. This psiloi was ignored, the Germans charged the legions again and again they were recoiled. At this point we realised that the lowly psiloi that Thom had deemed unworthy of attention was now within reach of the rear of the German general. A combined front and rear attack knocked him out and the shock of the English CinC's command finally breaking took the army over 50% losses. I had lost just under 10%, so 25 - 0 to me.

Game 4: Greg Mann, Nikephorian Byzantine, 990 AD
This army is small, but full of tough troops with superb command and control and almost unbreakable morale. I invaded. Greg had a large gentle hill in the centre of his deployment area, which I expected him to deploy on, but instead he deployed to the right of a vineyard that was slightly right of the centre of the table. This resulted in my deployment plan being less than optimal. Facing my cavalry and knights was a command of artillery and skoutatoi with a couple of psiloi. Their flank near the vineyard was protected by a small skoutatoi command in column. In reserve were some cataphract wedges and light horse and opposite my foot command on the right were the kavallarioi (superior cavalry) with a couple more light horse and some Rus auxiliaries. On his first turn, Greg advanced within artillery range and moved his cavalry command out to face and possibly outflank my auxilia.

My mounted would be shot to bits if they stayed where they were, so I attacked with them, although even that was risky. The legions moved up to support them. Aetius' auxilia advanced into the vineyard and the question was whether to send the Alans around the vineyard to (eventually) threaten the Byzantine rear, or across to fight the kavallarioi and prevent them threatening my rear. I picked the latter.
My mounted command got shot up on the way in, but overran the artillery and the supporting legions killed some skoutatoi. The cataphracts counter-attacked with some success. The Alans destroyed one of the kavallarioi elements and then feigned flight, but Aetius' auxilia had to feign flight too because they were in combat and in the same command. The result of this was Greg's entire army apart from 2 elements was made impetuous.

With 4 regular generals, Greg was able to prevent nearly all of his troops from making spontaneous advances. The flight of the auxilia had opened up the flank of my cavalry general to a bow shot from some skoutatoi. There was only a 1 in 18 chance of killing him, but, of course, it happened. This precipitated the rout of my mounted command next turn, although (with the aid of flank attacks by the legions) they did manage to destroy both the cataphract wedges before running away.
This left me with a huge hole in the middle of my army and Greg with two disheartened commands, which if I could kill one more element off would trigger the defeat of his army through the “spreading panic” effect. Try as I might, I just could not get the kill I needed and was continually losing casualties to the kavallarioi. Finally I threw my CinC in against one of the enemy generals which gave me a 1 in 6 chance of winning the game and a 1 in 18 chance of losing it. I lost. Score 6-19.

Game 5: Paul Mace, Graeco-Bactrian, 152 BC
I hadn't played Paul before, but I knew he had won some games up to this point so was fairly wary. He invaded and we both placed a lot of terrain, although the only pieces that mattered were a rocky flat in the middle of the table, a BU to the right of this and a marsh quite a long way to the left of it and in Paul's half of the table. I spread my army out as I wasn't sure where he would deploy, but the rocky area was clearly going to be key, so I put the legionaries opposite that. He deployed to the left of the rocky area with a pike phalanx next to it with psiloi behind and cataphracts to the left of them. Also in the cataphract command were some thuroeophoroi in a small vineyard and some Indian hillmen in the marsh. In reserve was the large CinC's command with cavalry, light horse, xystophoroi wedges and more thureophoroi and psiloi ready to move into the rocks.

I moved my mounted command across to face the cataphracts, the legions into the rocks and the Alans leftwards with a view to supporting the mounted battle in the long run. Aetius' auxilia started the long journey to the marsh and the subgeneral's auxilia started making their way towards the rocks. Luckily Paul did not use his mounted reserve to interfere with this, preferring to reinforce the cataphracts. He moved all his thureophoroi towards or into the rocks and the phalanx advanced, echeloning back to avoid being outflanked.
My cavalry charged the cataphracts and Paul's combat dice were five 1s in a row, resulting in four dead cataphract elements. The survivors were still dangerous, though, and reserves were arriving, so I did a feigned flight to escape any counter-attack.

The Greeks held their positions. My cavalry turned around to re-enter the fray and the legions attacked the corner of the phalanx and the thureophoroi in the rocks. The cavalry fight didn't go too well for me and the cataphracts, reinforced by some xystophoroi, killed everything they touched until the legionaries attack on the thureophoroi broke that command. At that point I did another feigned flight to keep my now disheartened cavalry out of range of the xystophoroi. The presence of Aetius' auxilia on the flank deterred pursuit.
I now fed in the remnants of the mounted command against the phalanx and supported them with the Alans. This was a bit of a risk, but if it paid off I should win the game. It worked as one of Gothic lancers rode down their opponents and disheartened the phalanx. Now I just needed to kill a column of pikemen that had been drawn into the rocky ground and hit in the front and flank by legionaries. Three times I attacked and three times they stood their ground. Time ran out so I had to settle for a winning draw score of 15-10.

Game 6: Dave Pallin, Middle Imperial Roman, 309 AD
The paradoxical battle against the ancestors, although it has to be said that by the time of Aetius, there weren't that many actual Romans in the army. This was potentially a difficult match-up because Dave's army contained Praetorians that would beat any of my infantry with ease, legionaries that would beat most of my infantry with ease, cataphracts that would beat my Roman cavalry with, legionaries armed with heavy clubs that would beat my lancers with ease and auxilia that were the equal of my own in quality, if not quantity. However, I had superiority of numbers in mounted and difficult terrain troops.
Dave invaded and picked a wood and a difficult hill, which both fell either side of his deployment area. I didn't want to fight his auxilia uphill, so placed a built up area next to the hill. If he defended it he would have no uphill advantage. If not, then it gave a safe route for my auxilia to advance past the hill. As it turned out, he deployed some auxilia on the hill but later moved them into the town. More auxilia were deployed in the wood and the rest of the army was between the wood and the town, Praetorians on the right, normal legions on the left and mounted behind. There was a small gap between the town and the end of the legions, which he later blocked with some more auxilia.

I advanced and split the Alans, some to go left over the hill, others right where it looked as though I might need reinforcements. Dave also advanced and moved the auxilia from the hill into the town. I used my psiloi to delay the Praetorians and attacked the normal legionaries. Most of my foot command, however, withdrew as they didn't want to get into serious combat with the superior praetorians.

After a couple of turns of fighting, Dave's ordinary legionaries were broken up into sex separate groups which would be very difficult to control if I did a feigned flight, so that is what I did, at the same time switching the Alans from the right to the left where I anticipated them pouncing on impetuous enemy chasing my cavalry. Unfortunately Dave's PIP dice were good next turn, allowing to keep control of the entire command. Therefore I had to turn round and bash through the hard way. Eventually the enemy command broke, but Dave was able to halt them to prevent a rout and they resisted all my attempts to shift them. Even the two auxilia in the town held out despite being surrounded on three sides. Meanwhile, Dave's Praetorians advanced and his mounted reserves were brought into play.

While I was still fighting my way through the broken enemy that just wouldn't die and the town, the Praetorians and cataphracts were able to catch up with my foot command and break them. The sight of this also disheartened my mounted command. Time ran out at this point (forgot to take a final picture, but there were a lot less of my infantry at the bottom right). Final score 12-13.
I finished up with a total of 94 points, which was enough to get me second place in the tournament and a prize consisting of a pint glass and a pack of “Forged in Battle” Dacian light infantry.
Lawrence Greaves